Thursday, February 9, 2017

Confrontation Kelts Continues...

A challenge to make three identical models look different from each other.

Three Rackham Confrontation Kelts.


Here you'll see stages from blocking out the values using underpainting,all the way to the finished product.


This underpainting establishes where the shadows and highlights are; the darkest and lightest values, and middle tones.


I've added some basic color. Browns for leathers, and pink, peach, reddish yellow tones for skin.
My goal here was to experiment in trying to emulate Frank Frazetta's Conan flesh tones.


I've added highlights to the skin. I've made it slightly different for each figure. One is more ruddy, one is more yellow, one more brown. Thin glazes of the lighter colors make them less abrupt, and you can always go back and glaze your original base colors back over any area that got too light or chalky.


I've added middle tones to the leather kilts. I then used washes to darken down some areas. Then I added highlights.


Here I've done the same thing as above with the leather sleeve, belt, and boot wraps.


Using yellows and purples for the bronzes. Celts, after all, lived mostly in the Bronze Age. Purples are a great way to shade and tone down yellows.


I've mixed a grey with a greenish/bluish tint for the sword blades. Painted the bones, and started the hair.


Decided to add a white highlight to the sword blades. You can see the subtle difference from the above pic. I also added some highlights to the hair.


Final highlights to the hair. Almost forgot to highlight the leather wraps on the sword hilts.
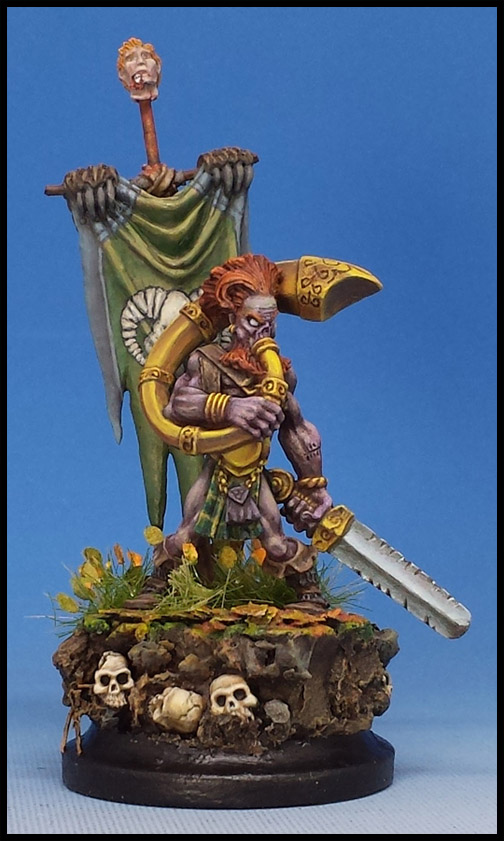
Woad designs on the skin to finish them off, and final pictures taken using a light box.
Filled in the reservoir on the right hand base with Secret Weapon Miniatures Realistic Water.

Most of the paints used were the Reaper Miniatures Master Series Clear Paints, Secret Weapon Miniatures Acrylic Weathering Paints, Vallejo Washes, and Privateer Press 3 Acrylics.

The resin bases were provided by the customer.

Monday, January 23, 2017

Firbolg Musician - Finished pics

Final images of the Firbolg Musician

This miniature was an experiment using Reaper Miniatures' Clear paints 
from their Master Series Paints line.
The clear paints are, as described in the title, very translucent.
In my work in progress posts you can see how I started building up 
the values in my underpainting, from dark to light,
so the shading was mostly in place before applying the color.
I couldn't get my lightest highlights using only the Clears though,
so I used a favorite light color,
the Weathered Wood paint from Secret Weapon Miniatures.
I feel like I could have pushed the darks to be darker,
but at some point, you have to call the model done.


Thursday, December 29, 2016

Fir Bolg Musician - Work In Progress - Stage 1


Stage 1
Work In Progress
Celtos
Fir Bolg Musician
Sculpted by Kev White for i-KORE Games


Tuesday, October 11, 2016

The Butchers Guild

Wow! So it was after Adepticon that I was approached to paint an entire Guild Ball team.
I had the Starter Box for the Butchers Guild in my hands a month later.
You may have seen my post about finishing those four models.

After Gen Con I started in earnest on the remaining six figures.
To my surprise, another two were added;
the Kickstarter version of Ox, and the newly released mascot, Truffles.

Well, here they are, finally finished.


Boy, sometimes you wish you had the brainstorm to put your name on each
picture, after you've finished everything and already posted them on the blog. Sigh.
You all know I painted them, and Hank has the team in his hands now.
Good luck with them, Hank. May their reign be bloody!


Wednesday, August 10, 2016

I love the old Rackham figures! Here's Drac Mac Syro from the Confrontation Kelts...

I've been posting updates of this on my Facebook profile as I've been working, and
this is the blog post that brings all that Work In Progress information together.
And please forgive me for my many fonts and font sizes.


I thought it would be fun to see what he looks like next to the
original Confrontation card, so...


In the beginning...


And then there was skin...


And Non-metallic Metals...


And gems...


And now he's done!!


Friday, May 13, 2016

Guild Ball -- Home Field Advantage

Sometimes the bases make the models...


Guild Ball:

Home turf for the Butcher's Guild.


In which I walk you through the four bases I've made
for the Butcher's Guild starter box.

Wooden planks were wanted as atmosphere.
Naturally I thought meat should be included.


Below: I used actual wood stirring sticks, scoring 
them with a wood carving tool to accentuate 
the grain, and make it look like flooring.


Below: I used Green Stuff, the two part epoxy putty to sculpt
steaks and sausages. I wanted the steaks to look like beef strip
steaks, so I first sculpted the strip loin, and cut steaks from it,
as you would do with a real strip loin.


Below: I had to figure out which models go on which bases, and
then figure out which one gets the steak and which gets the links.


Below: Primed using Badger Air Brush's Stynylrez Red Brown Primer.
Being used to either white, black, or grey primer, it was interesting to work around this color. 
I don't have an air brush, so as you can see, this works great with regular brushes too.


Below: The first thing I did was use Secret Weapon and
Citadel washes, applying them all over first, and then targeting
certain areas more to darken them.


Below: I forgot to take note of the colors I used for the actual wood, which were applied first, but these are the colors I used for the meats.


Below: Here's what my palette looked like. Among the reds, and whites, you can see a cool gray color as well, which is one of the colors I used on the wood planks for a temperature contrast.


And here's the finished product!
Makes you want to heat up the grill.